Windows 10 and 11: how to clean the system and hard drive without additional software
How to clean the system and hard drive without additional software Do you feel that Windows 10 or Windows 11 is starting to run out of hard drive space and the hard drive is running out? Here's how to save several tens of gigabytes, using only Windows tools and without installing any unnecessary software.

You may have noticed: over the course of updates and app installations, Windows 10/11 never stops increasing. In a few months, it is not exceptional to see the operating system being "enriched" by several tens of GB . So much so that the space available for a hard disk or SSD is reduced to a little, so that you can find yourself running out of space on a small configuration, and that the system sometimes experiences a slowdown for no reason.
Sure, there are dozens of programs that can clean the hard drive and system, but not all of them have a very good reputation. Sometimes some of them are ineffective (but make you think the opposite by displaying biased statistics), and sometimes you install adware without warning. Even the reputable CCleaner had a bad time, after being accused in 2018 of spying on its users.
For our part, to carry out the big cleaning process, we decided not to use any additional software . Especially since Windows 10 and Windows 11, as standard, have everything necessary for effective hard disk cleaning. It would be a shame to deprive yourself of them. Hence, say goodbye to old unused files and old Windows installations. Here's how to save several tens of gigabytes and clean your hard drive.
HOW TO CLEAR JUNK FILES FROM WINDOWS 10/11
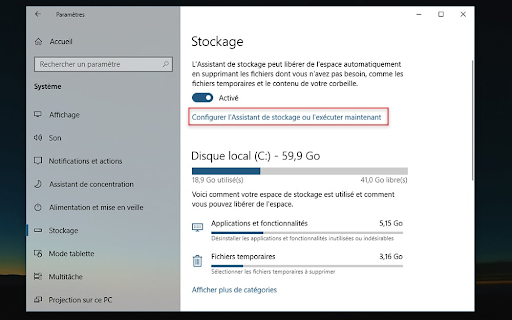
We will not insult you by advising you to empty the trash, surely you already know how to do it throughout the ages. On the other hand, Windows 11 and even Windows 10 benefit from an important novelty that many users miss. The system includes a tool to scan all unnecessary files with a few clicks. To access it, click the Start menu, and then select the Settings icon (the icon denoted by a sprocket). In the window that appears, go to the System option, then click on Storage .

Go to Temporary Files . There, you should find that a large amount of data consumes your hard drive, especially if you have never turned on Storage Sense.
First, you should see a section titled Previous installation(s) for Windows . This space can occupy several tens of gigabytes on the hard drive, as shown in the screenshot below. It can be from an older version of the system (Windows 10, Windows 7, Windows 8, or Windows 8.1) or from a previous installation of the current version of Windows.
Windows now benefits from the major update annually, but keeps on disk all the files needed to uninstall that same update in case of a problem. Therefore, it keeps 4 or 5 GB of files corresponding to the old installation of Windows 10 or 11. And finally, the last case: you are part of the Windows Insider program, which consists of testing all beta versions of Windows. Again, all previous versions are kept, unless you decide otherwise.
And it can go fast! In any case, and if you consider the current version of Windows stable enough, you can delete all these files, in order to save space on your hard disk. So you can check the previous Windows installation(s) section.

We do not recommend checking the downloads section, especially if you are the type of person who uses the corresponding folder to store all the programs, documents, or photos that are sent to you. This section will disappear in a future update for Windows 10 or Windows 11. However, you can check out the delivery optimization file options, as well as the Windows upgrade log files.

Final thumbnail partitions, temporary internet files, DirectX Shader cache, Windows Error Reporting, Feedback, and Diagnostics can also be checked, but they shouldn't save you a huge amount of hard drive space. Once you have verified all these sections, go back to the top of the Temporary Files window, and then click on Delete Files. After a few seconds, you should have already gained several gigabytes on your hard drive.

How to remove apps installed by default
Once set up, Windows 10 and 11 install more than twenty games and apps that you may not necessarily need. In some cases, it may just be a shortcut, not the full application, which only takes up 16 KB. But in other cases, it is the installation file, or even the full application, that Windows 10 saved. Bubble Witch 3 Saga, Candy Crush Soda Saga, Disney Magic Kingdoms... Don't you care?
Still from the settings > system > volume, click on Applications and features (you can also go to this same section by selecting Settings > Applications functions ).

You should see a list of all the applications that you installed yourself, as well as those that were placed when Windows 10/11 was installed. Select the apps you want to remove, click Uninstall, and everything will run. Note that you can categorize these same apps by size instead of name, making it easier to identify the most demanding apps.

How to delete all unnecessary files "automatically"
You can have Windows automatically scan certain files regularly. Windows 10 and 11 have their own self-cleaning system. To do this, go back to Settings > System > Storage . Click Configure Storage Wizard or run it now.
Make sure Storage Sense is set to On. In the Run Storage Sense section, you can specify when it should be turned on: either when you run out of space on your hard drive, or at regular intervals (daily, weekly or monthly).

In the Temporary Files section, you can also set the frequency at which these same files are deleted. Daily deletion may not be helpful, but you can at least set it to 14 days.

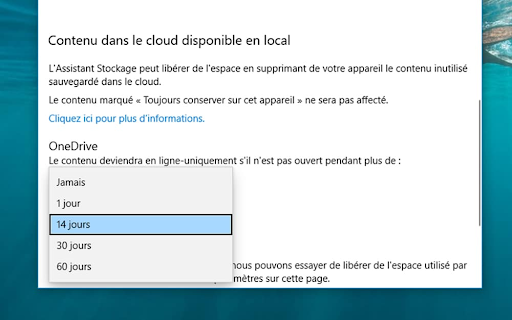
Finally, still from the Storage Assistant settings, you also have the option to adjust the space allocated to OneDrive on your hard drive. If some files are never displayed locally, you can erase them from your hard drive, keeping them online. From the OneDrive function of the assistant, you can set the frequency of deletion locally (every day, every 14 days, every 30 days or every 60 days). Finally, if you really find OneDrive useless, know that you can also easily deactivate it, or even uninstall it .